> For the complete documentation index, see [llms.txt](https://www.opal-rt.com/docs/llms.txt). Markdown versions of documentation pages are available by appending `.md` to page URLs; this page is available as [Markdown](https://www.opal-rt.com/docs/op8120/op812x-mscc-conditioning-modules/op8125-voltage-amplifier-150-v-30ma-4-channels.md).
# OP8125 Voltage Amplifier 150 V-30mA - 4 channels
## Description
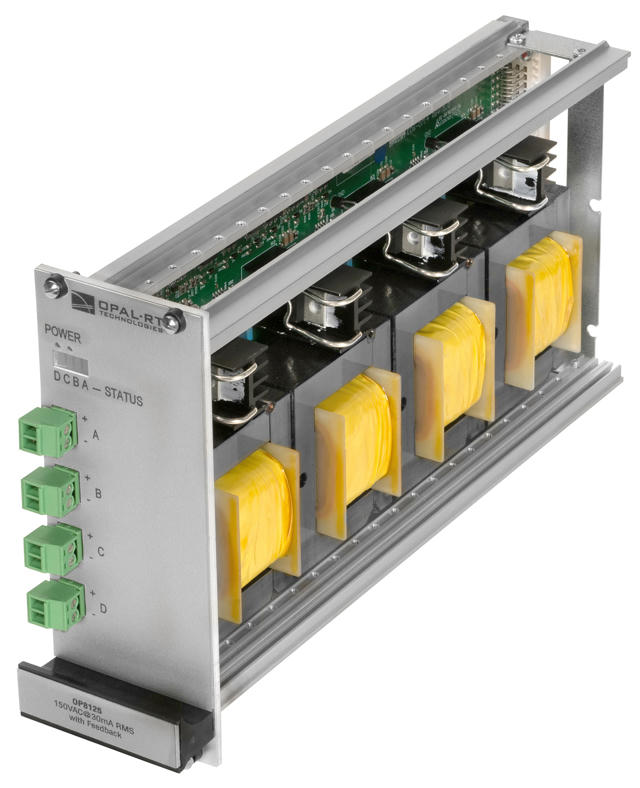
The **OP8125** module converts four standard ±16 Vpeak voltages into high-voltage output, up to 150 Vrms. Each output is individually isolated from the simulators.
The OP8125 is short-circuit proof and its temperature and supply voltages are continuously monitored. A thermal shutdown prevents the voltage amplifier from exceeding its maximum operating temperature. An indicator is present to indicate if the output is at fault.
The OP8125 can be used standalone with minimal connection or used in an OP8120 chassis for a total of 32 high-voltage outputs per chassis.
When used in an OP8120 chassis, each channel is configured to match the OPAL-RT’s DB37 standard pinout.
Each output can deliver a current of up to 30 mA.
OP8125 Voltage Amplifier Module for OP8120 chassis
## Features
* Voltage amplifier module for 4 isolated individual channels
* Differential inputs
* Fault display
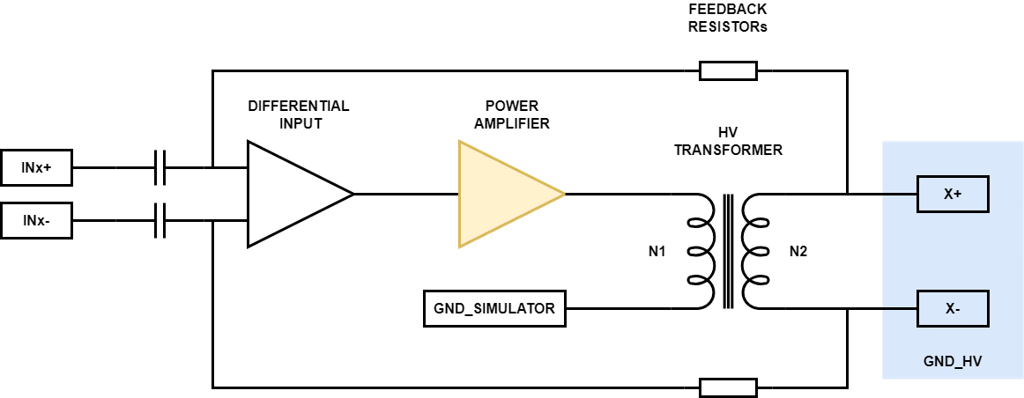
### Separated high-voltage ground
Functional isolation only. The high‑voltage section includes a high‑impedance connection across the isolation barrier, so the secondary is not fully galvanically isolated from the primary.\
The high‑voltage grounds remain separate from the simulator ground and are treated as individual nodes. Use the front‑panel banana jack to bond the chassis to earth when required.
## Applications
* Excitation voltage emulation (grid, electrical machine, etc.)
* High-voltage amplifier
## OP8125 interface
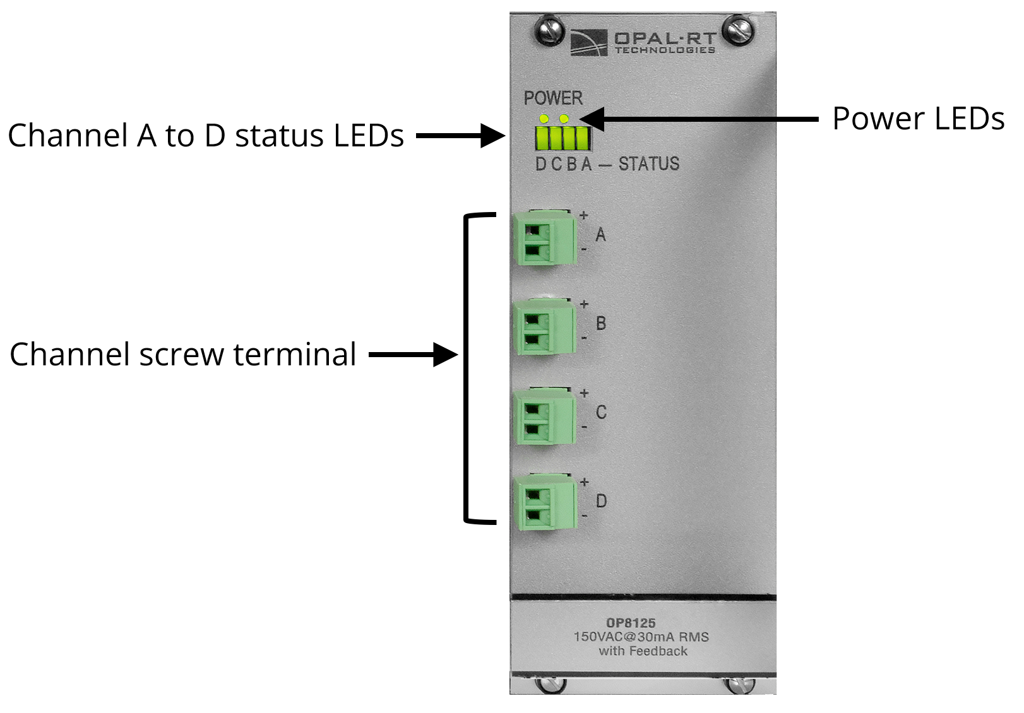
Channels are identified as **channels A, B, C and D**. The OP8125 has four (4) screw terminal connectors.
### Channel status LEDs
Each channel has one LED. If **all is functioning properly**, the LED will be **green**.\
If LED is **red**, it indicates either an **overcurrent** or a **thermal protection fault** on this channel.
### Power LED
**Each module has two power LEDs:**
* When the **left LED** is **on**, it indicates that the internal **±15 Vdc power** is functioning properly.
* When the **right LED** is on, it indicates that the **±24 Vdc power** is functioning properly.
## Specifications
### General specifications
| **Product name** | OP8125 Signal Conditioning Module |
| ---------------- | ------------------------------------------------------------------------------- |
| **Part number** | 126-0714 |
| **Power supply** |
(provided by OP8120 chassis)
±24 Vdc @ 1.5 A
12 Vdc @ 275 mA
|
| **Dimensions** | 23.43 × 10 × 5 cm (9.22” x 3.94” x 1.96”) |
### Analog inputs
| **Connectors** | DB37 |
| ------------------------------------ | ---------------- |
| **Coupling** | AC, differential |
| **Differential input voltage range** | ±16 V |
| **Differential input resistance** | 20 kΩ |
### Analog outputs
| **Connectors** | Screw terminals |
| ----------------------------- | --------------------------- |
| **Coupling** | DC, referenced to its HVGND |
| **Voltage range** | ±150 Vrms for gain 15 ±3% |
| **Maximum current** | 30 mA RMS |
| **Operating frequency range** | 40 Hz - 5 kHz (at -3 dB) |
| **Phase shift** | 28° at full load (at -3 dB) |
---
# Agent Instructions
This documentation is published with GitBook. GitBook is the documentation platform designed so that both humans and AI agents can read, navigate, and reason over technical content effectively. Learn more at gitbook.com.
## Querying This Documentation
If you need additional information that is not directly available in this page, you can query the documentation by asking a question.
Perform an HTTP GET request on the following URL with the `ask` and `goal` query parameters:
```
GET https://www.opal-rt.com/docs/op8120/op812x-mscc-conditioning-modules/op8125-voltage-amplifier-150-v-30ma-4-channels.md?ask=&goal=
```
`ask` is the immediate question: it should be specific, self-contained, and written in natural language.
`goal` is what the user is ultimately trying to achieve, the reason they need the answer. Sharing it helps GitBook give you a better, more relevant answer. A goal is most helpful when it describes the outcome the user wants rather than restating the question. For example, with `ask=how do I create an API token`, a goal like `automate deployments from our CI pipeline` lets GitBook tailor the answer to that use case.
The response will contain a direct answer to the question and relevant excerpts and sources from the documentation.
Use this mechanism when the answer is not explicitly present in the current page, you need clarification or additional context, or you want to retrieve related documentation sections.