Knowledge Base
Welcome to OPAL-RT’s Knowledge Base
OPAL-RT offers a repository of support information for optimal use of its technology.
Please note that OPAL-RT knowledge base is not fully optimized for mobile platforms.
For optimal experience, use a desktop computer.
|
Reference Number: AA-01022// Views: AA-01022// Created: 2015-10-08 23:25:02// Last Updated: 2023-04-19 19:02:05 HowTo How To Request and Install a License for RT-LAB 11.x+ How To Request and Install a License for RT-LAB 11.x+License ActivationBeginning with the latest version, RT-LAB 11.x+, each target must be activated with a valid license to run a simulation. Follow these three simple steps to activate a license on a target.
Before activating a target, you should verify that your systems (host + target) are installed correctly, according to the following prerequisites: PrerequisitesA. RT-LAB 11.x+ must be installed on the host computer: see How To Install RT-LAB 11.x+. B. Each target must be available in RT-LAB. See the “Detected Targets Wizard” section of the user guide. C. If it is your first installation of RT-LAB on this computer, see the “Installing RT-LAB Components” section of the installation guide. Select the section based on the type of the system (Redhat, Win32). Step 1: Setup the target link (To do if only have localhost or nothing in the Targets list of the Project Explorer)a. On RT-LAB, right click on Targets in the Project Explorer and select New > New Target.
b. Specify a Name (this can be anything you want) and the IP Address of the target computer.
c. Click Ping to verify that the communication is properly established with the target computer. Then, click Finish and see your new target appear in the Project Explorer.
d. Double click on your newly created target to open its properties and click on the Software tab to see the versions of RT-LAB installed on your target. If the current version you are using is not installed, select Install current version (11.x+). If the current version is installed, select it and click Set as default. A green dot should appear beside it.
Step 2: Request a Licensea. Open the target (double click [1]), select the “License” tab [2] then click “Request” [3] to open a wizard that will guide you through the license request process. NEVER select localhost, it is not an actual target. It represents the windows compiler of the host computer that may only be use to "simulate" the real-time target. It is mostly used to university students who doesn't always have access to the target computer to compile their models.
b. Fill in the license request form.
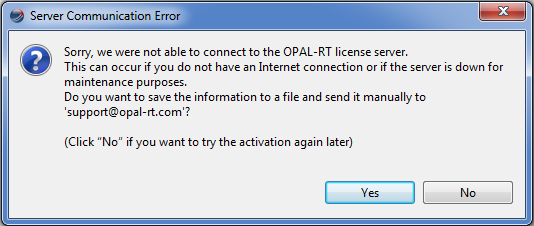
Verify request information and then click “Finish” to complete the process. The request will be sent automatically through a web service on the Internet. When the wizard is completed, you will receive either a success or an error message:
If your host is not connected to Internet, the wizard will prompt you to save the request file and send it by email to our support team ( https://www.opal-rt.com/contact-technical-support/ ).
Note: Step 3: Install the licensea. Before starting, ensure that you have received the required license for the target from our support team. Copy the license file to the host (remember the path on the drive). b. Install the license: Open the target (double click [1]), select the “License” tab [2] then click “Install” [3] to open a file browser.
c. Browse to the license file and click “Open”. The file will be sent and automatically installed in the target. IMPORTANT NOTE: For RT-LAB 11.3 and above, please note that you will install a .zip file. The zip file contains two licenses. The OS license and RT-LAB license.
IMPORTANT NOTES ABOUT LICENSES IN RT-LAB 11.x+: A. The license is now a binary file (.bin) instead of a ".lic" file B. The license check is made at load only. You can open RT-LAB, edit and compile your models with no license. C. The license stands only on the target computer. RT-LAB 11.x+ can be installed with no license on an infinite number of host computers. For Windows-target users, the license is saved under C:\OPAL-RT\LicServer. D. The RT-LAB 11.x+ licensing system is totally independent from the license server for RT-LAB 10.4.x and previous versions. Both license systems can reside and function on the same hosts/targets. E. The RT-LAB 11.x+licensing system is totally independent from Acresso's FLEXlm software previously used for license management. It is now purely an Opal-RT Technologies solution. F. If you are experiencing any problem when installing the license, please see Tips-to-solve-issues-when-installing-licenses-with-RT-LAB-11.x. IMPORTANT NOTES ABOUT LICENSES IN RT-LAB 11.3+: A. You can install a .zip file. B. The .zip file contains two licenses. OS license (.osbin) and the RT-LAB license (.bin). C. You can install the OS license and the RT-LAB licenses individually as well or do the step shown in A. |